Self Help Knowledge Base
Table of Contents
< All Topics
Print

Lead Managament

List Page

Lead List Page

Path: https://account.solidperformers.com/leads

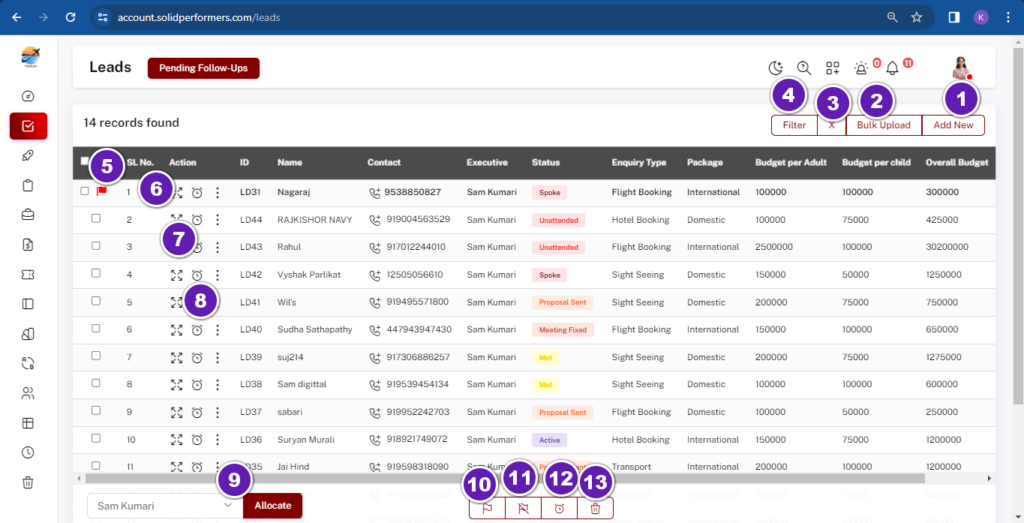
  1. Add a Lead manually one by one
  2. Bulk upload the leads in one shot. You need to download the sample format, fill in the data and upload the data
  3. All the follow-ups that need to be performed for that particular day will be visible here
  4. You can be able to filter the leads based on various criteria that was defined on the settings page
  5. The action buttons where you can perform various actions for a particular lead
  6. Most of the actions will be disabled once you move a lead from a lead module to a deal module or client module as you will be performing all future actions in that module.
  7. You can perform multiple bulk actions from here like bulk update, bulk allocate, or bulk delete
  8. The list page data can be modified based on your business requirements easily from the settings page. You can reorder the fields, add a new field, disable a field or rename an existing field. All these default flexibilities are available in field customization.

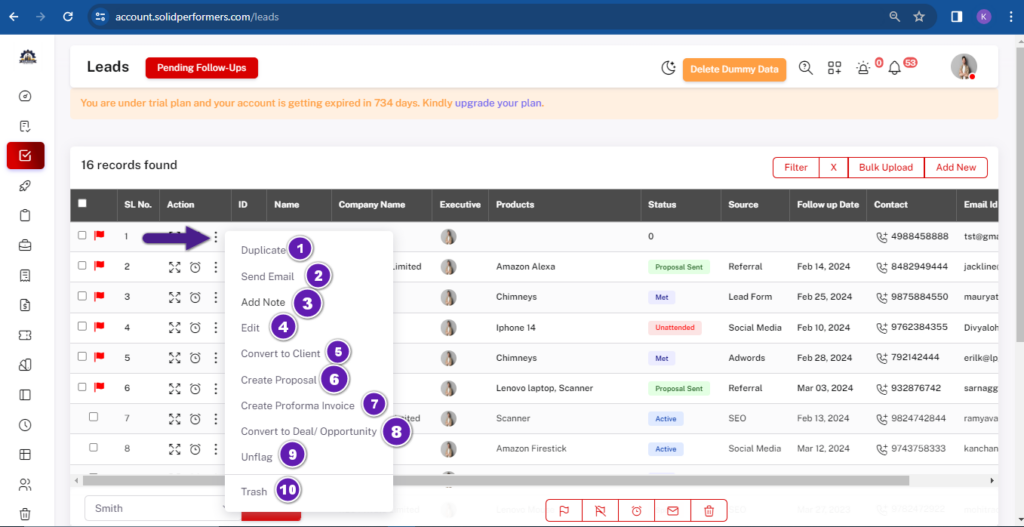
Lead Quick Actions

Leads Action buttons
  1. You can flag important leads on top irrespective of the data of lead creation. You can unflag it from the action button when required
  2. You can send emails, SMS, or WhatsApp to a particular lead from here. You need to perform the settings for this before sending emails, SMS, or WhatsApp.
  3. You can convert a lead to a client and all the data from the lead will be transferred to the client module for future reference. Field mapping needs to be done from the settings page.
  4. You can create a proposal for a lead from the lead module and the details for this lead will be fetched from the lead module while creating the proposal.
  5. You can convert a lead to a deal and all the data from the lead will be transferred to the deal module for future reference. Field mapping needs to be done from the settings page.
  6. You can trash any unwanted leads and you can also restore the leads from the trash module if you have deleted any leads by mistake.
  7. You can remove the bulk flags from here. When a new lead is allocated to an executive, the lead will come with an automated flag and if multiple leads are flagged and if you want to remove those flags, then you can use this button. Note: This will not remove the manually enabled flags.

Follow-up Update

Lead Followup Update
  1. You can be able to add a follow-up for a lead by clicking on the timer
  2. You can put a future follow-up date and time if you need to set a follow-up for that lead. A reminder will be shown, and the leads will be displayed on the follow-up leads page on that day of follow-up. If you don’t want to perform a follow-up, you can leave these fields blank.
  3. You can change the stage, status, group, and rating of the lead once you had a conversation or update regarding that lead. You can define all the dropdown dynamic field data based on your business need and requirements under the settings panel.
  4. You can add a related comment with regard to the communication that happened with the lead in the comments section.

Lead Quick View

Lead Quick View
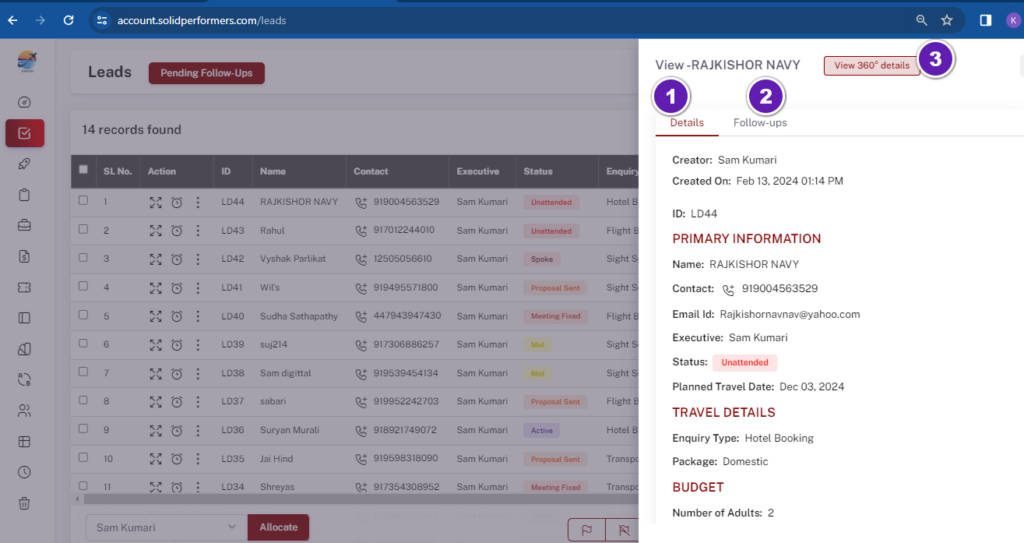
  1. A quick view button to check the lead update and details
  2. The last follow-up update which you have added will be visible here along with the current stage, status and when is the next follow-up date and time and the comment data which you have entered
  3. You will also be able to see the list of past updates below. You will never miss any data and the complete history of the lead will be available here
  4. You can click on view 360-degree details to check the complete details about the lead
  5. In the details section, the basic data about the lead will be available and if you want to modify any of these data, you can simply edit the lead and update the data.

Lead Detailed View Page

Lead Detailed View Page
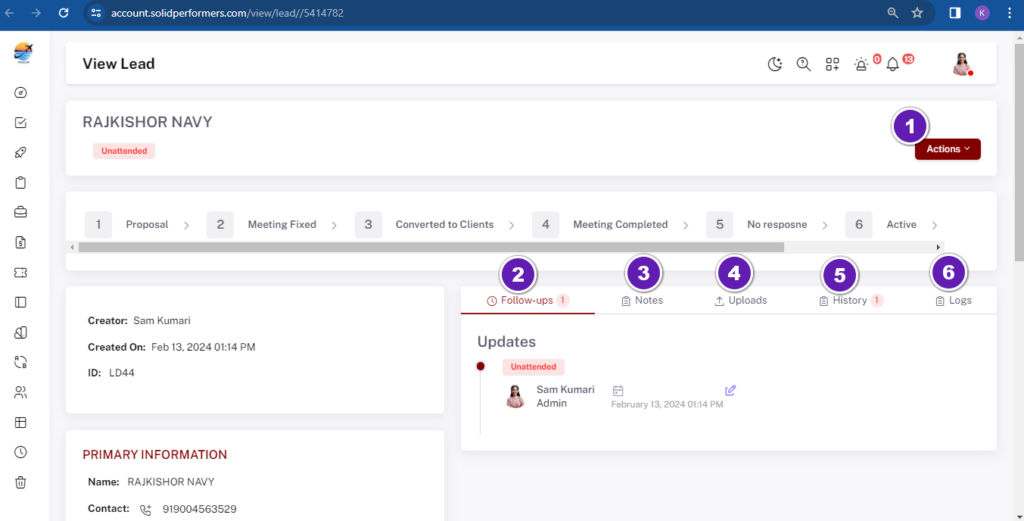
  1. The flow of lead with regards to various stages will be shown on top
  2. The left panel will have the complete details about the lead
  3. The follow-ups which was available in the quick view page will be visible here as well
  4. You can be able to add related notes about this lead
  5. You can be able to upload any related files or images about this lead and can refer easily in the future
  6. The complete history of the lead with regards to the executives who handled this lead will be displayed here
  7. The logs like sent emails, calls made, etc., will be visible here
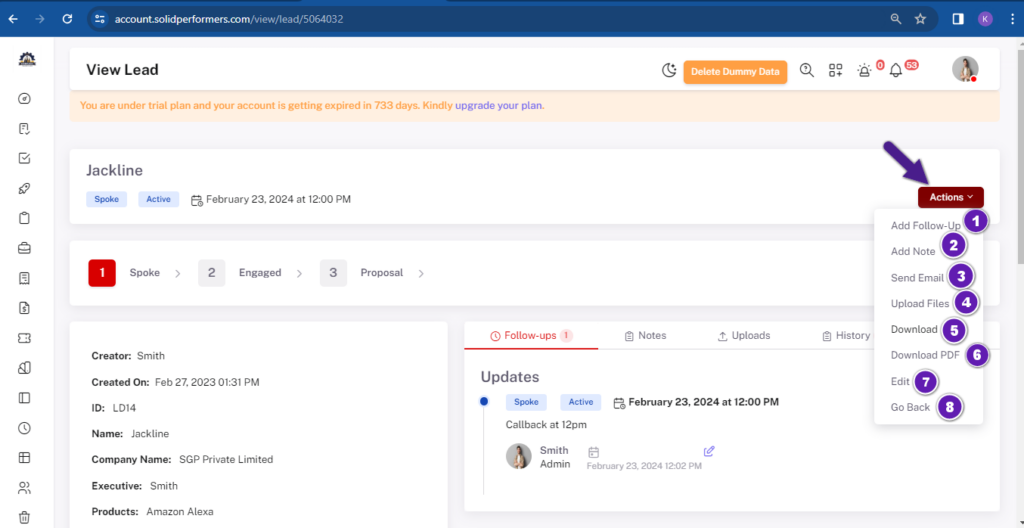
  8. You can perform lots of functions using the action buttons
  9. You can also edit a lead and modify any of the data available on the left panel from here.
  10. At the bottom, you will find the list of emails sent to this lead along with the status, proposals created for this lead or if there are any other linked modules, those details also will be listed here.

Lead Settings

Snip Solid Performers Pvt Ltd Google Chrome 6

Path: https://account.solidperformers.com/setting

  1. You can modify all the fields as per your business need for the lead module
  2. You can modify all the stages as per your business need for the lead module
  3. You can modify all the statuses as per your business need for the lead module
  4. You can modify all the groups as per your business need for the lead module
  5. You can modify all the ratings as per your business need for the lead module
  6. You can modify all the groups as per your business need for the lead module
  7. You can easily integrate multiple lead sources like lead form, chatbot, API, Facebook, Instagram, Google Ads, etc., from here
  8. You can perform lead score settings from here as per your need
  9. Map all your lead fields to client fields and this will be used when you convert a lead to a client
  10. You can perform some additional advanced settings related with leads over here
  11. Map all your lead fields to deal fields and this will be used when you convert a lead to a deal

Lead Field Customization

Lead Field Customization

Path: https://account.solidperformers.com/settings/field_customization/lead

  1. You can modify all the fields as per your business need for the lead module
  2. You can modify all the stages as per your business need for the lead module
  3. You can modify all the statuses as per your business need for the lead module
  4. You can modify all the groups as per your business need for the lead module
  5. You can modify all the ratings as per your business need for the lead module
  6. You can modify all the groups as per your business need for the lead module
  7. You can easily integrate multiple lead sources like lead form, chatbot, API, Facebook, Instagram, Google Ads, etc., from here
  8. You can perform lead score settings from here as per your need
  9. Map all your lead fields to client fields and this will be used when you convert a lead to a client
  10. You can perform some additional advanced settings related with leads over here
  11. Map all your lead fields to deal fields and this will be used when you convert a lead to a deal

Lead Stage Customization

s1
Snip Lead Stage Solid Performers Pvt Ltd Google Chrome

Path: https://account.solidperformers.com/leadStages

  1. You can add a new stage.
  2. You can see the lead stage id. This id has to be used while doing Bulk Uploads from the excel sheet.
  3. The lead Stage name will be added from here.
  4. Lead order or sequence of the stages. The stages in the update section will be displayed according to this order in the lead module.
  5. You can hide the data of all the leads which match this particular stage from the list page of leads. For e.g. if you don’t want to display the lost leads on the list page, then you can use this function and hide the data. The data will still be visible on the filters and reports but not on the list page of leads.
  6. You can add the border color of the stages from here for quick and easy identification.

Lead Status Customization

s3
Snip Solid Performers Pvt Ltd Google Chrome 7

Path: https://account.solidperformers.com/leadStatuses

  1. You can see the lead status ID. This ID has to be used while doing Bulk Uploads from an excel sheet
  2. You can add a new status.
  3. The lead Status name can be added from here.
  4. On which Lead stage particular Status is dependent can be selected from here.
  5. Lead order or sequence of the status. The status in the update section will be displayed according to this order.
  6. You can hide any leads with a particular status from the list page of leads. For e.g. if you don’t want to display the lost leads on the list page, then you can use this function and hide the data. The data will still be visible on the filters and reports but not on the list page of leads.
  7. You can select whether you want this particular status to be shown to other roles or not.
  8. You can select different colors for a different statuses.

Lead Source Customization

s5
s6

Path: https://account.solidperformers.com/leadSources

  1. You can view the Lead Source ID. This ID has to be used while doing Bulk Uploads from an excel sheet
  2. You can add a new lead source.
  3. The source name can be added from here.

Lead Group Customization

s7
s8

Path: https://account.solidperformers.com/leadGroup

  1. You will get the Lead Group ID. This ID has to be used while doing Bulk Uploads from the excel sheet.
  2. You can add a new Group.
  3. Group Name can be added from here.
  4. You can set the color coding for the Group.

Lead Rating Customization

s9
s10

Path: https://account.solidperformers.com/leadRatings

  1. Lead Rating ID will be displayed here. This can be used while doing bulk uploads from an excel sheet.
  2. You can add new Ratings.
  3. Rating names can be added from here.
  4. Lead Rating order or sequence of the Rating. The status in the update section will be displayed according to this order
  5. The lead Rating color can be set from here.

Lead score settings

a1
a2
a3
a4

Path: https://account.solidperformers.com/settings/score_settings

  1. Split up: Here you have to select the field on which you want to set the score based on a percentage
  2. You can select the percentage here and you can also decrease or increase the score by clicking on the plus or minus based on your requirement.
  3. You can enable score in percentage or in total by using score display settings.
  4. You can select the stage or other related settings here.
  5. Website tracking code can be taken from here. This code needs to be implemented in the website in order to track the website-based scores
  6. The domain name that needs to be tracked should be added here. You can create a website tracking domain by clicking on add new.
  7. Once the website tracking domain is added, it will display your code in the action button. Copy the code and paste it into the header section of your website on all pages.

Lead to Client Mapping

a5

Path: https://account.solidperformers.com/settings/module_mapping

1. Here on the left side you can see all the fields which you are having in the lead module and right side you can map those fields with the client module fields.

2. Make sure to update the settings after mapping the fields.

When you convert a lead to a client, the data will be transferred to the respective fields.

Lead to Deal Mapping

a6

Path: https://account.solidperformers.com/settings/module_mapping/lead_deal

1. Here on the left side you can see all the fields which you are having in the lead module and right side you can map those fields with the deal module fields.

2. Make sure to update the settings after mapping the fields.

When you convert a lead to a deal, the data will be transferred to the respective fields.

Lead to Contact Mapping

a6

Path: https://account.solidperformers.com/settings/module_mapping/lead_contact

1. Here on the left side you can see all the fields which you are having in the lead module and right side you can map those fields with the contact module fields.

2. Make sure to update the settings after mapping the fields.

When you convert a contact to a lead, the data will be transferred to the respective fields.